
How misting works for mushroom kits and how to avoid overwatering
Most mushroom growing kits need misting two to three times a day with a fine spray bottle. The goal is to keep the growing surface moist but never waterlogged, remember you are just keeping damp, by spraying you are not adding water like you would a plant.
That is the simple version. In practice, this depends on the variety you are growing (how you mist depends on which variety you are growing) and the growing environment. Getting this right is the single biggest factor in whether your kit produces a full, healthy crop or stalls, dries out, or develops problems.
This guide covers exactly how to mist each type of kit we sell, the signs that tell you something is wrong, and a simple daily routine that works for most people.
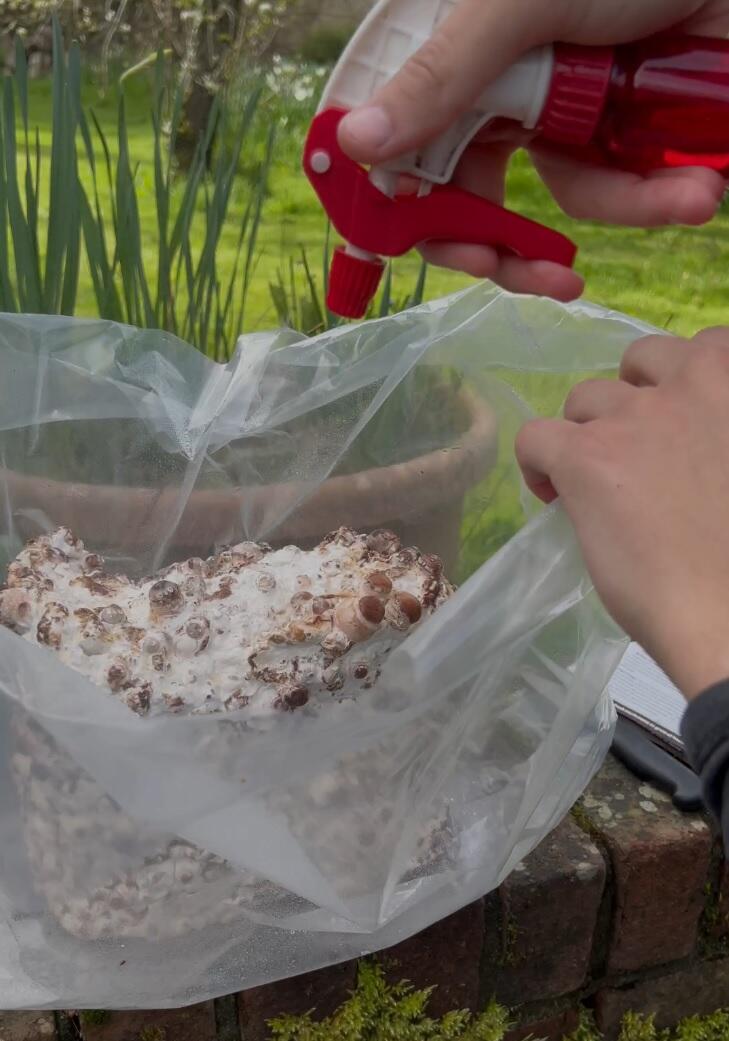
A fine mist is all your kit needs. The surface should look damp, not wet.
What misting actually does (and why it matters)
Mushrooms are not plants. They do not have roots that pull water from soil. Instead, they require a humid environment to thrive. In the wild, mushrooms fruit in humid conditions, often after rain, in damp woodland or sheltered spots where moisture hangs in the air.
When you mist your kit, you are recreating those conditions. The spray bottle creates a fine mist that raises the humidity around the mushrooms and keeps the growing surface (whether that is topsoil, compost, or the surface of a log) gently moist. This allows the mycelium to transport water and nutrients into the developing mushrooms.
Without enough moisture, pins (baby mushrooms) dry out, crack, or abort before they reach harvest size. With too much water, the surface becomes waterlogged, which can lead to pooling, bacterial contamination, slimy patches, and unpleasant smells.
The key is consistency. A little moisture, often, is far better than a big soak once a day.
The basic misting technique
Use a clean spray bottle set to a fine mist (not a stream or jet). Hold it around 15 to 20cm from the surface you are spraying. Give the kit a few gentle pumps, enough to leave a light sheen of moisture on the surface without creating visible puddles or pools of standing water.
Ordinary tap water is fine. There is no need to use distilled, filtered, rain or bottled water. The mycelium at this stage is well established and resilient. Just make sure the spray bottle is clean and the water is fresh.
Mist two to three times a day as a starting point. Morning and evening works for most people. If you can fit in a lunchtime spray as well, even better. The exact frequency depends on your home environment. Warmer, drier rooms (near radiators, in well-heated kitchens) will need more frequent misting. Cooler, naturally humid rooms (bathrooms, utility rooms) may need less, adjust as needed.
If you notice the surface drying out between misting sessions, increase the frequency. If you see water pooling or the surface looks shiny and wet rather than just damp, ease off.
How to mist each variety: what changes and what stays the same
Every mushroom variety we sell is grown indoors and needs humidity to fruit properly. But the method varies because each species has a different relationship with moisture. Here is what to do for each type of kit.
Lion's Mane
The rule: never spray the compost or the mushroom directly.
Lion's Mane is the most humidity-sensitive variety we grow. Direct water on the mushroom causes excessive evaporation which causes brown discolouration and can trigger rot. Direct water on the compost can create conditions for bacterial contamination.
Instead, spray the paper towels inside the humidity bag. This raises the ambient humidity around the mushroom without any water touching it directly. The goal is to create a gently humid environment, like a damp morning in woodland, not a wet one.
If you notice browning or yellowing on your Lion's Mane, water contact is usually the cause. See our Lion's Mane tips page for more troubleshooting, or read the full Lion's Mane growing instructions.

Brown patches on Lion's Mane are almost always caused by direct water contact. Spray the paper towels inside the bag instead, never the mushroom itself.
Oyster mushrooms (Pink, White, Grey, Tarragon, King Oyster)
The rule: spray twice daily to keep the compost moist.
Oyster mushrooms are more forgiving than Lion's Mane. You can spray the compost surface directly and mist the inner walls of the bag or container. The surface should look damp and dark in colour, not dry and pale.
One thing to watch with oyster varieties is thick mycelium on the surface. If the mycelium has grown very densely (a thick white layer), water can sit on top rather than soaking in. This causes pooling, which leads to mushrooms not being able to pin. If you see water sitting on the surface rather than being absorbed, dab with paper towel to remove, reduce your spray volume per session.
For King Oyster specifically, focus your misting on the topsoil and inner bag walls rather than directly on developing pins. King Oyster needs more fresh air than other oyster varieties, so keep the bag open and consider fanning gently after misting.
Chestnut and White mushrooms
The rule: keep the topsoil casing layer consistently moist and dark in colour.
These kits use a topsoil casing layer over the compost. Your job is to keep that casing layer damp. When it is properly hydrated, it should be a deep, dark colour with no dry patches or light speckles visible.
Spray the topsoil once or twice daily, just enough to maintain that even dark colour. If the topsoil starts to dry out and show lighter patches, increase your misting. If you see standing water on the surface, you have overwatered and should let it dry back a little before the next spray. If water is pooling on the topsoil, you may have an overgrowth of mycelium locking out the moisture, so it is worth checking our overgrown mycelium guide if so.
These varieties take 16 to 24 days to produce a first harvest, so consistency matters. A steady routine over two to three weeks is what gets results. For a detailed visual guide to what properly hydrated topsoil looks like, see our Chestnut and White hydration guide.
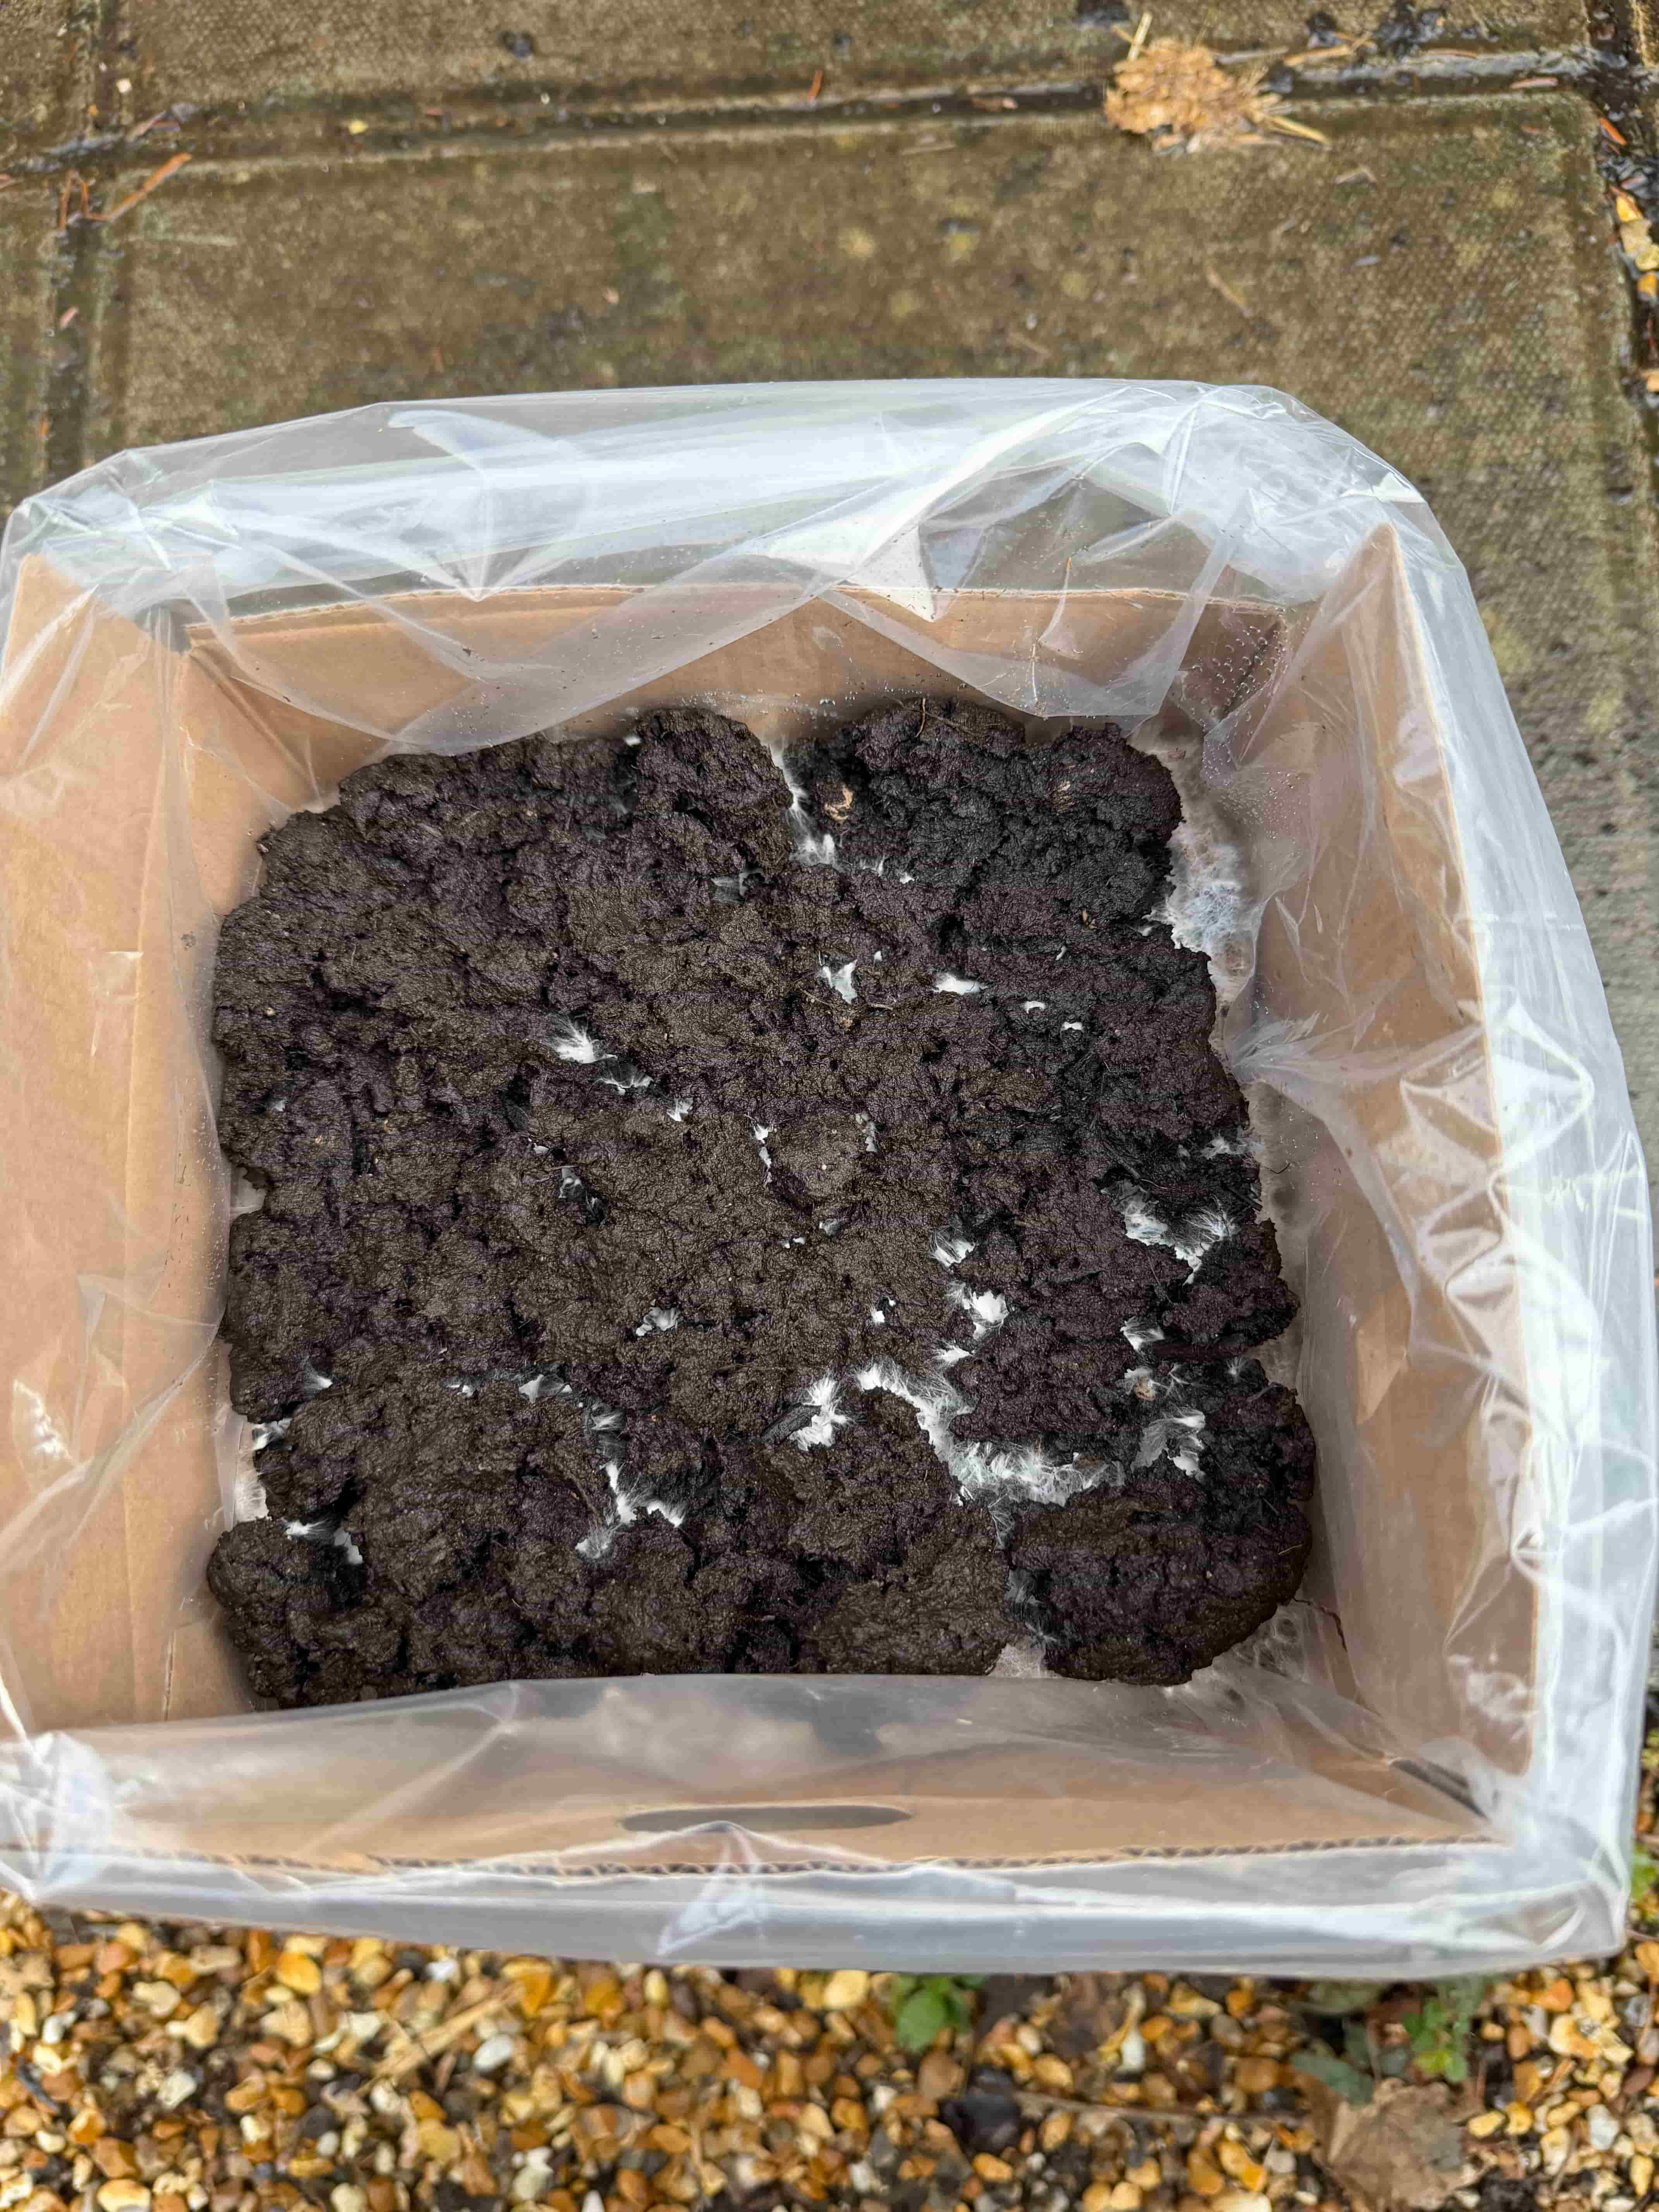
Correctly hydrated: deep, dark, even colour across the whole surface. This is what you are aiming for.
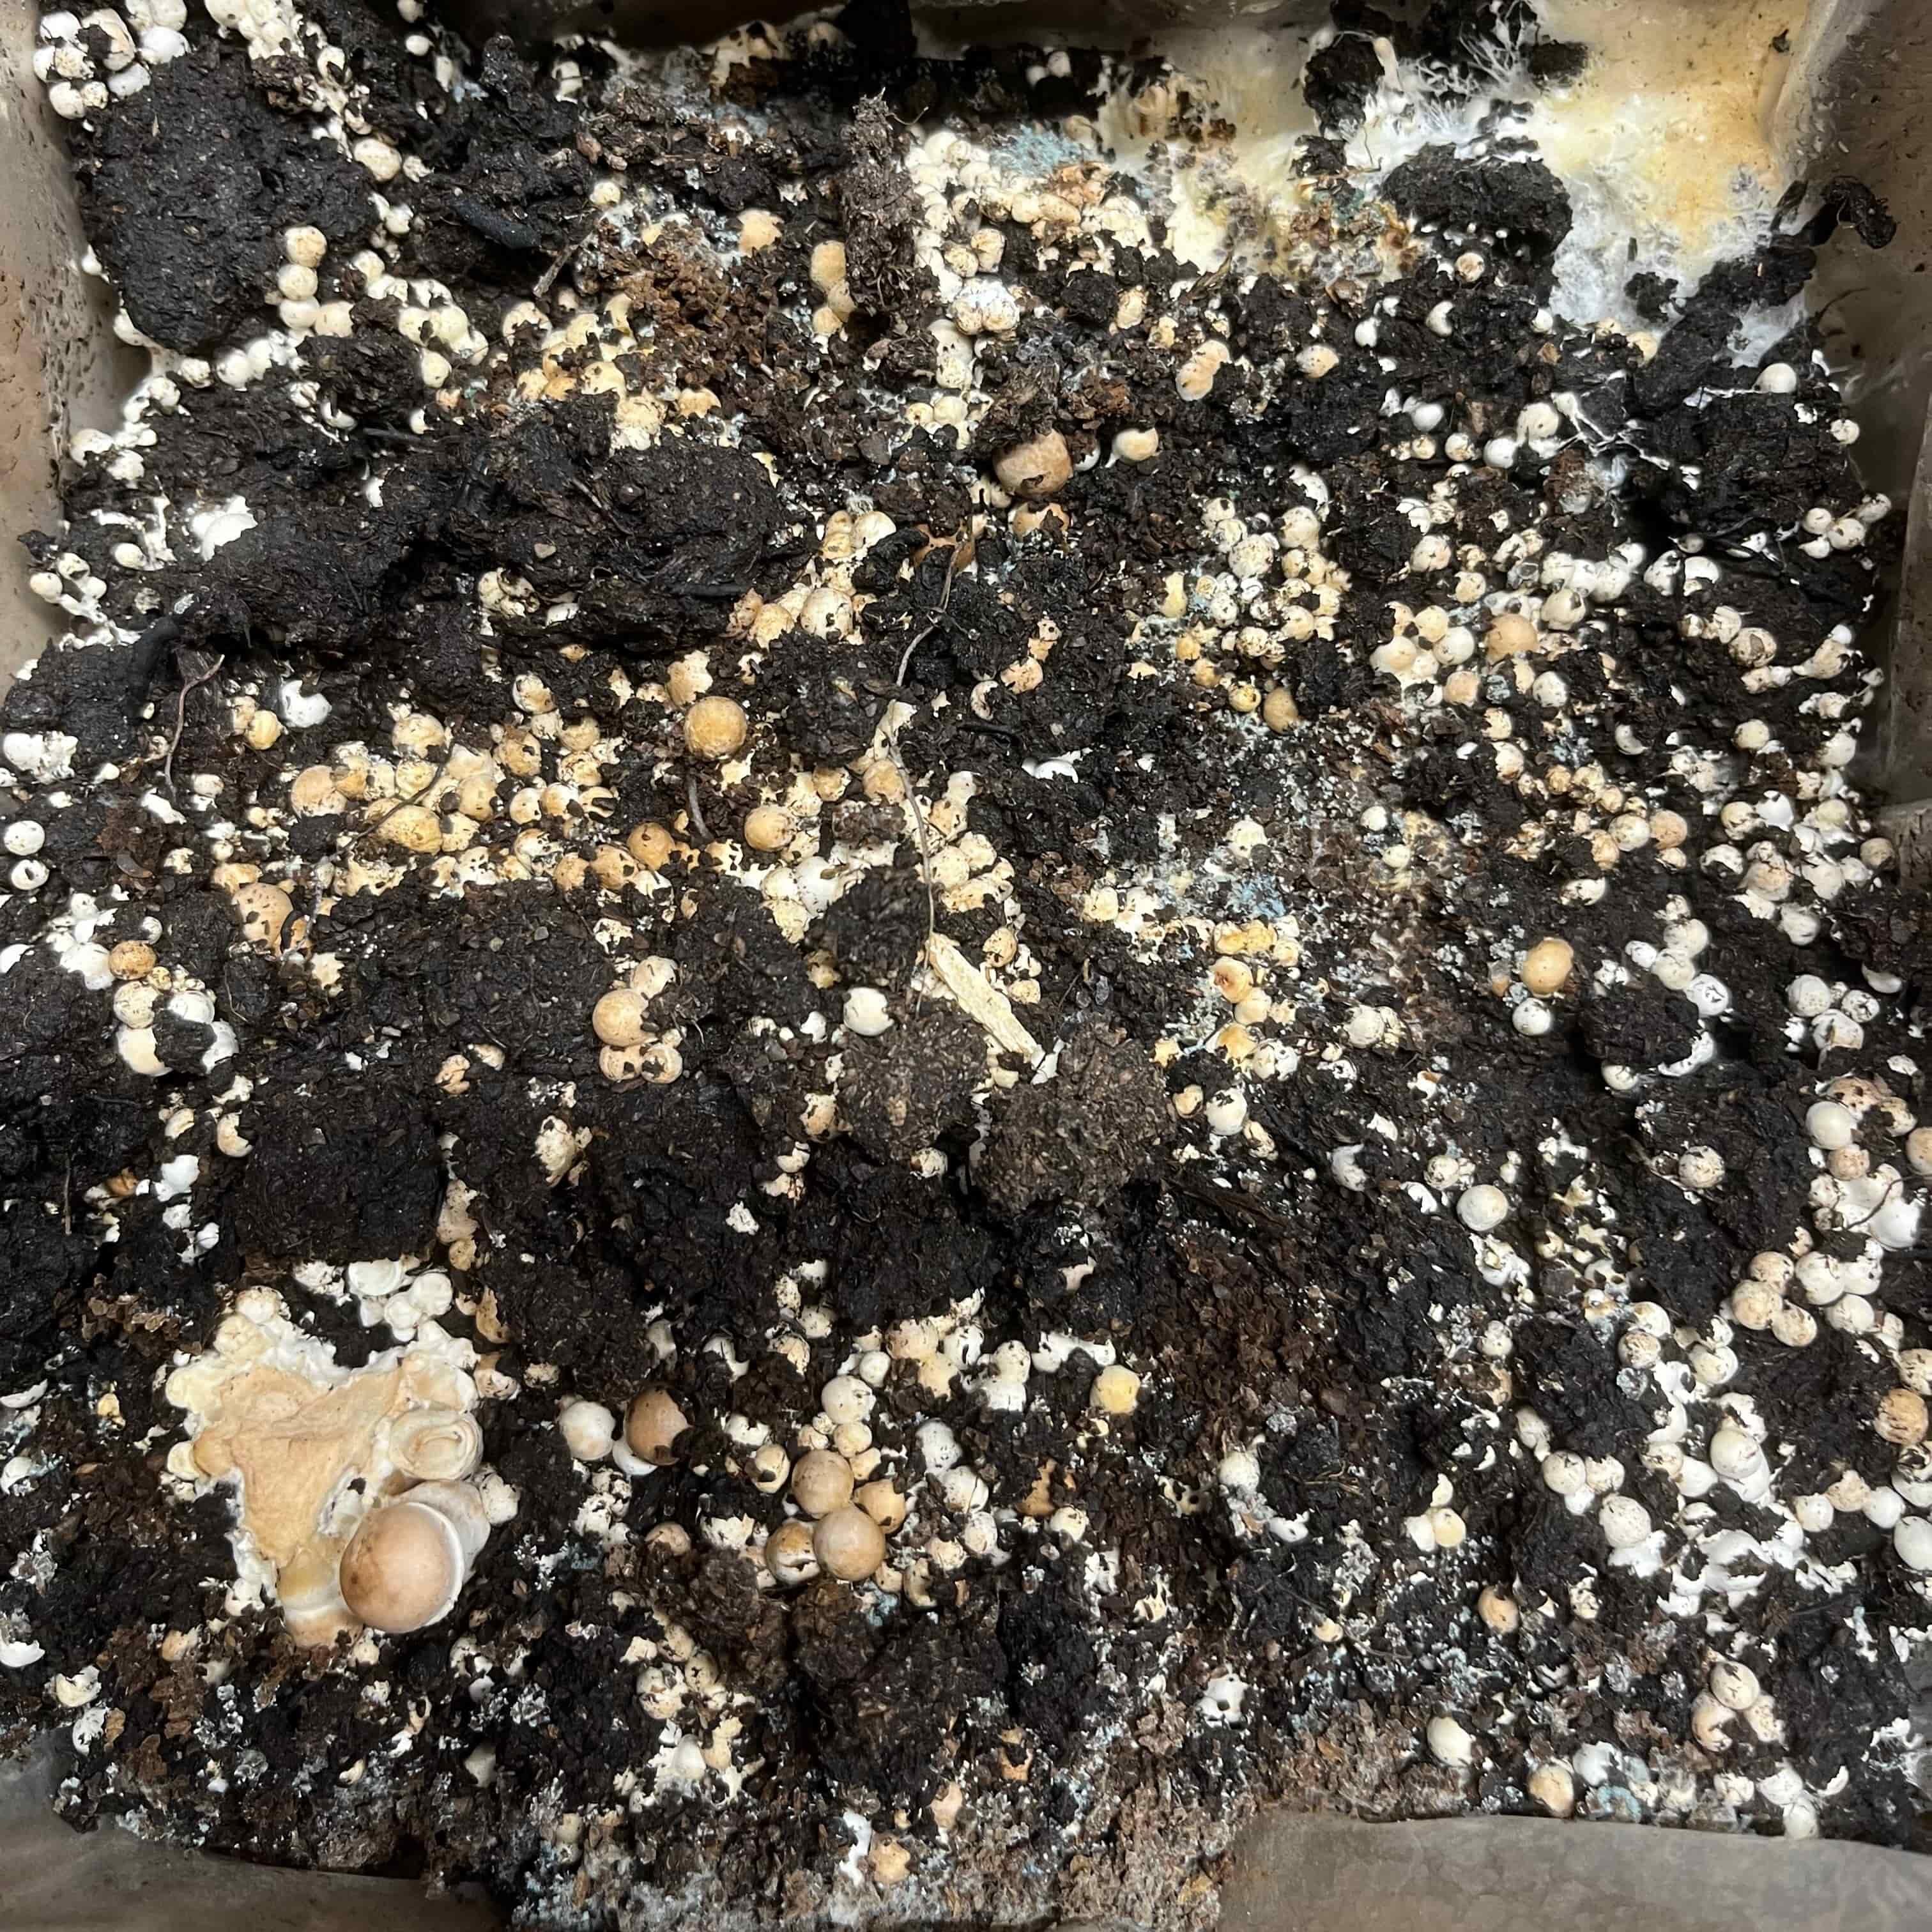
Too dry: pale patches and light speckles visible. Increase misting immediately.
Shiitake
The rule: mist the block surface and bag walls two to three times daily.
Shiitake kits arrive as a colonised block. Mist the surface of the block and the inside of the bag to maintain humidity. The surface should look damp but not wet.
Shiitake mushrooms grow more slowly than oysters but are relatively straightforward in their moisture needs. Keep things consistently damp rather than alternating between dry and soaked. After the first harvest, let the block rest (reduce misting) before encouraging a second flush.
Reishi / Nameco
The rule: minimal care required. Reishi and Nameco grows in the bag.
Both grow kits are the lowest-maintenance variety we sell. Growing inside the bag and requires very little intervention. You do not need to mist it in the same way as other kits. Just ensure the bag stays sealed and the kit is kept in a room within the recommended temperature range (14 to 21 degrees).
Black Pearl Oyster
The rule: mist the compost, avoiding direct spray on the mushrooms as best you can.
Black Pearl Oyster uses the log format with a protective wrapper, and plate setup (not the standard three-hole lid box used by other oyster varieties). Mist the top of the compost to keep it consistently moist. Avoid spraying developing mushrooms directly.
How to tell if you are overwatering
Overwatering is more common than underwatering with mushroom kits. Most people instinctively water too much because they are used to looking after plants, where more water generally means more growth. Mushrooms are different. They need humidity, not saturation.
Pooling water on the surface. If you can see visible puddles or a shiny wet layer sitting on top of the compost or topsoil, you are giving too much water per session. Reduce the number of pumps per spray and let the surface absorb what is there before adding more.
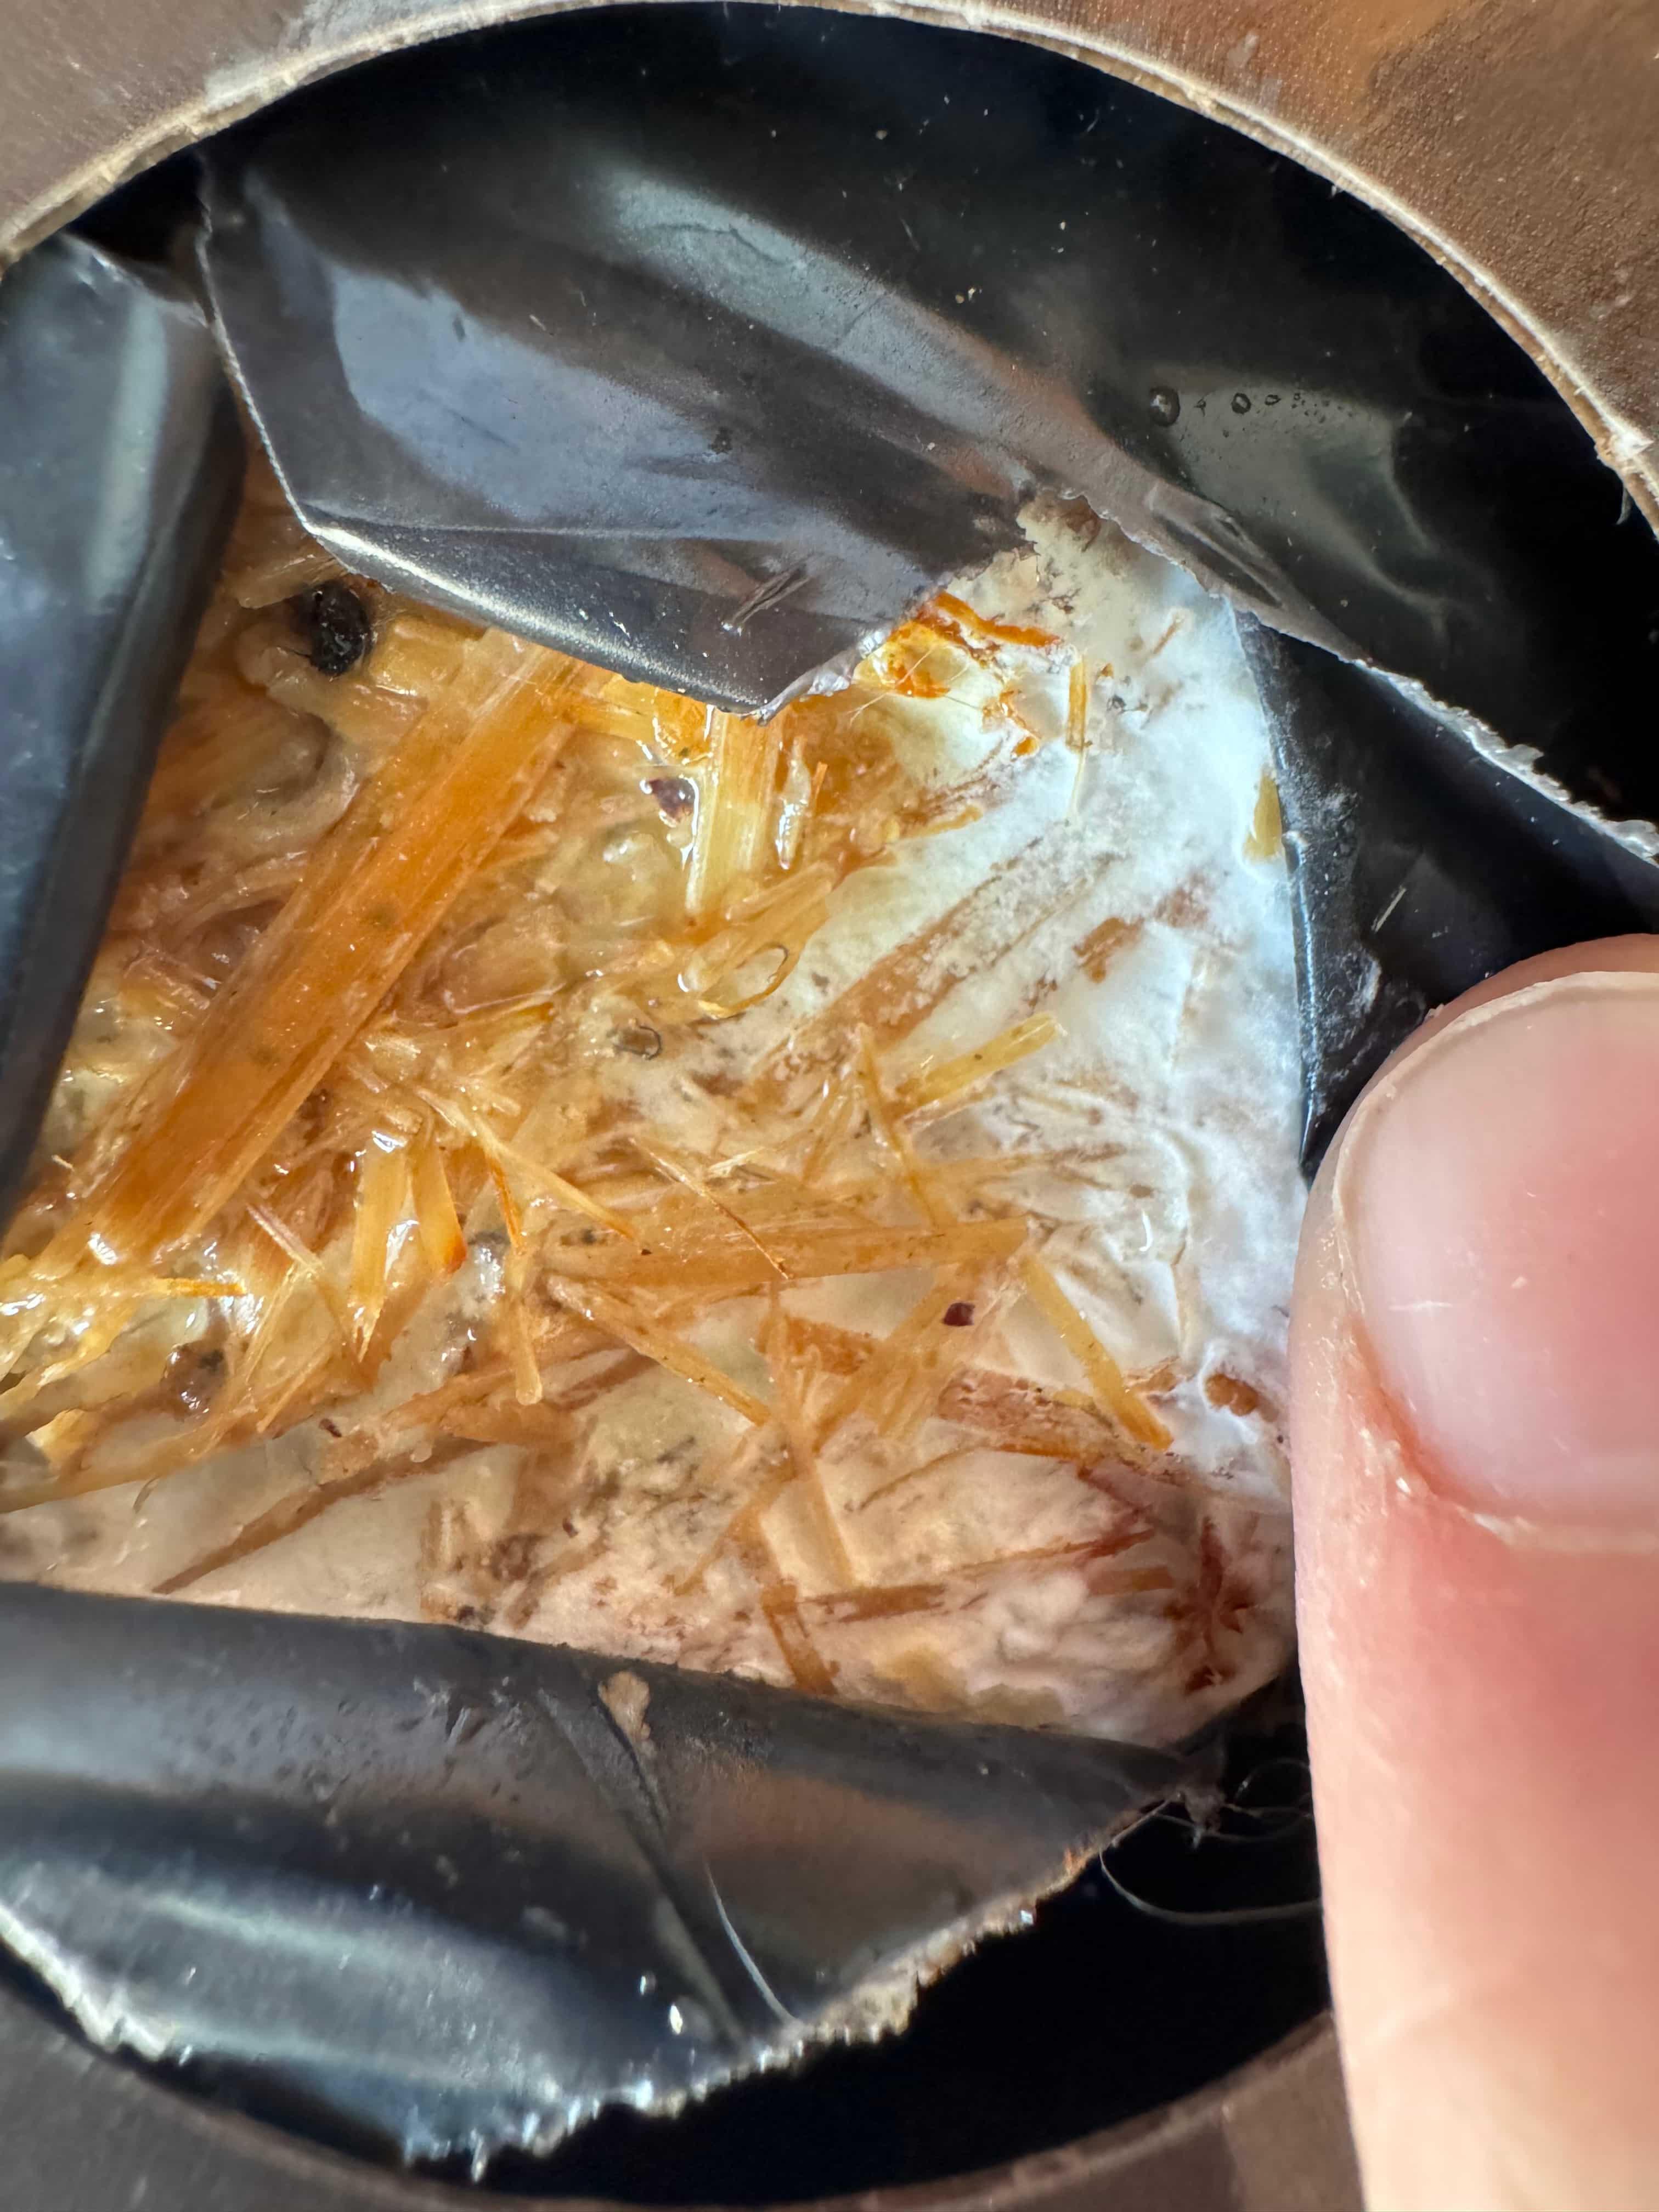
Too wet: visible pooling on the surface. Stop misting, dab away the excess, and reduce the number of sprays per session.
Slimy or greasy-looking patches. A slippery, slimy film on the surface usually means bacterial growth caused by excess moisture. This can spread quickly if not addressed. Stop misting for 12 to 24 hours to let the surface dry back slightly, then resume at a lower frequency.
Unpleasant smells. A healthy mushroom kit smells earthy and mushroomy. If it starts smelling sour, vinegary, or off, that is usually a sign of bacterial contamination driven by too much moisture or poor airflow. Improve ventilation and reduce misting.
Mushrooms turning soft and mushy. If developing mushrooms feel soft, waterlogged, or are discolouring at the edges, they may be getting too much direct water. This is particularly common with Lion's Mane. Switch to spraying the bag walls or paper towels rather than the mushrooms themselves.
How to tell if you are not misting enough
Dry, pale, or cracked surface. The compost or topsoil should look dark and evenly moist. If it looks pale, dusty, or is cracking, it has dried out. Increase your misting frequency immediately and give it a few extra sprays to rehydrate.
Pins that dry out or abort. Small mushroom pins that shrivel, turn brown, or stop growing are often a sign that humidity dropped too low at a critical moment. Once pins have aborted, they will not recover, but the kit can still produce new ones if you correct the humidity.
Stalled growth. If your kit seems to have stopped developing and there is no obvious contamination, check whether the surface has dried out. A period of low humidity can pause growth, but it usually resumes once conditions improve.
For a visual reference of what normal growth looks like at each stage, see our grow kit visual timeline.
A simple daily misting routine that works
If you want a routine you can stick to without overthinking it, this is what we recommend for most kits.
Morning: Check the surface. If it looks dry, give it 3 to 5 pumps of fine mist. If it still looks damp from yesterday, skip it or give it just 1 to 2 pumps.
Evening: Same check. Mist if needed. This is also a good time to make sure airflow is adequate, as mushrooms produce carbon dioxide and need fresh air to develop properly shaped caps.
Optional midday top-up: If your home is warm, dry, or well-heated, a quick lunchtime spray can make a difference, especially during winter when central heating dries the air.
The whole routine takes less than 30 seconds per session. The biggest risk is not overwatering or underwatering, it is forgetting to mist at all for several days in a row. Consistency beats perfection.
If you know you will miss a day (travelling, busy weekend), give the kit a slightly heavier mist before you leave and place it in the most naturally humid room in your home (bathroom or utility room usually works). A shallow dish of water placed near the kit can also help maintain ambient humidity.
Simple ways to boost humidity without extra equipment
You do not need a humidifier or any specialist equipment to keep your kit happy. Here are a few methods that work well in most UK homes.
Place a shallow dish or tray of water near the kit. As the water evaporates, it raises the humidity in the immediate area. This is particularly helpful in warm, dry kitchens.
Use a humidity bag, some of our kits come with a bag or wrapper that helps trap moisture around the growing area. Keep this in place and spray inside it rather than removing it. If your kit does not include one, you can place the kit within a carrier bag, open at the top which will improve ambient humidity, particular useful in dry environments / high airflow rooms.
Choose a naturally humid room. Bathrooms, utility rooms, and rooms without radiators tend to hold moisture better. If your kit is in a warm, dry kitchen next to a hob or oven, consider moving it somewhere cooler and more stable.
Keep the kit away from direct heat sources. Radiators, sunny windowsills, and warm spots near ovens or boilers all dry the air quickly and will make it much harder to maintain consistent humidity.

Consistent misting, good airflow, and a stable temperature. That is all it takes to get a crop like this.
Need the variety-specific details?
Our full misting guide covers exactly how much water each variety needs, with photos showing what properly hydrated compost looks like versus too dry or too wet. If you have not started growing yet, browse our ready-growing mushroom kits, each one comes with clear instructions and our product support team is always on hand if you need help.
Browse Growing KitsFrequently asked questions
How often should I mist my mushroom kit?
Two to three times a day for most varieties. Morning and evening is a good baseline. In warm or dry homes, a midday spray helps too. The surface should look damp but never have standing water on it.
Can I use tap water to mist my mushroom kit?
Yes. Ordinary tap water is perfectly fine. There is no need to use distilled, filtered, or bottled water. The mycelium is well established by the time the kit reaches you and is not sensitive to the trace minerals in tap water.
Should I spray water directly onto the mushrooms?
It depends on the variety. For Lion's Mane, never spray the mushroom or the compost directly. Spray the paper towels inside the humidity bag instead. For oyster mushrooms, you can spray the compost surface but avoid soaking developing pins. For chestnut, white and king oyster kits, spray the topsoil layer. When in doubt, spray the surfaces around the mushrooms rather than the mushrooms themselves.
My kit has water pooling on the surface. What should I do?
Stop misting for 12 to 24 hours and dab away the excess water with paper towel. When you resume misting, use fewer pumps per session. If the surface of a white, chestnut or king oyster mushroom growing kit has a thick layer of white mycelium that is preventing water from soaking in, gently break the surface with a fork. See our overgrown mycelium guide for more on this.
I forgot to mist my kit for two days. Is it ruined?
Probably not. Give the surface a good misting to rehydrate it, and resume your normal routine. If the surface has dried out significantly, give it a few extra sprays over the next day to bring it back. Any pins that dried out during the gap may not recover, but the kit should produce new ones once humidity is restored. If you are going away for a couple of days, place the kit in a humid room and leave a dish of water nearby, if going away for longer we recommend popping the kit in the fridge to keep it dormant for up to a week.
My mushroom kit smells bad. Is that an overwatering problem?
A sour or vinegary smell usually indicates bacterial growth, which is most often caused by excess moisture combined with poor airflow. Stop misting for a day, improve ventilation around the kit, and check whether water has been pooling. A healthy kit should smell earthy and mushroomy. If the smell persists or you see green or black mould, contact our support team with a photo for advice.
Do I need a humidifier to grow mushrooms at home?
No. A spray bottle and a sensible choice of room are all you need. Placing a shallow dish of water near the kit, keeping the kit in a naturally humid room, and misting regularly are enough for all of our varieties. A humidifier is only worth considering if your home is exceptionally dry (for example, underfloor heating throughout with no naturally cooler rooms).
Should I change how I mist between the first and second flush?
After the first harvest, let the kit rest for a few days with reduced misting. This allows the mycelium to regroup before producing the next flush. When you see new pins forming, resume your normal misting routine. The block may have shrunk slightly, which is normal as the mycelium consumes nutrients. It may also need a little more moisture to rehydrate before the second flush takes off.
Published by Merryhill Mushrooms / Sussex, UK